Most black-eyed susans struggle because gardeners underestimate how large the plants actually become after a few growing seasons. A seedling that looks modest in the pot can spread 18 to 24 inches wide by its second year, crowding out everything nearby. Black-eyed susans, or Rudbeckia, are tough perennials that thrive in borders, raised beds, mass
Most black-eyed susans struggle because gardeners underestimate how large the plants actually become after a few growing seasons. A seedling that looks modest in the pot can spread 18 to 24 inches wide by its second year, crowding out everything nearby.
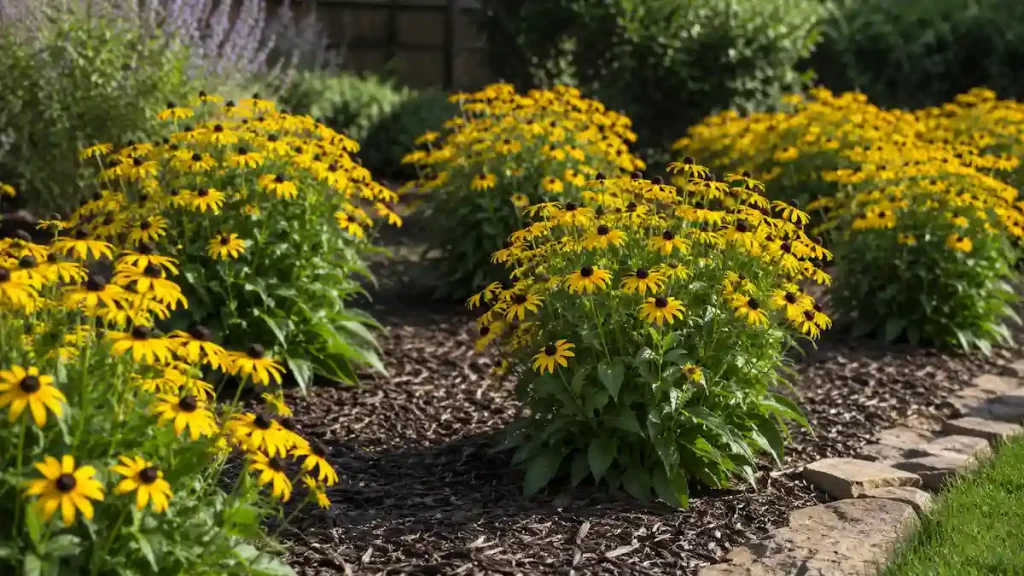
Black-eyed susans, or Rudbeckia, are tough perennials that thrive in borders, raised beds, mass plantings, and pollinator gardens. But correct spacing at planting determines how well the entire bed performs for years.
Whether you are starting from seed, transplanting nursery plants, or planning a large flower bed, the spacing recommendations below will help you avoid overcrowding.
Black-Eyed Susan Spacing Chart
| Plant Type / Stage | Recommended Spacing | Notes |
| Seeds | 2 to 3 inches | Thin to 12 to 18 inches |
| Seedlings | 12 to 18 inches | Based on variety size |
| Standard plants | 18 inches | Most common spacing |
| Rudbeckia fulgida ‘Goldsturm’ | 18 to 24 inches | Clump-forming perennial |
| Large varieties | 24 to 30 inches | Rudbeckia maxima etc. |
| Containers | 1 per 12-inch pot | Compact types only |
How Far Apart Should You Plant Black-Eyed Susans?
Most black-eyed susans should be planted 18 inches apart. Compact varieties can be spaced 12 inches apart, while large varieties need 24 inches or more to allow for mature spread and proper airflow. Always base spacing on the mature clump size listed on the plant tag, not on how the seedling looks at purchase.

What Does 18-Inch Spacing Mean?
Plant spacing is measured from the center of one plant to the center of the next, not from the edge of the foliage or the rim of the pot. So two plants spaced 18 inches apart have 18 inches between their stems at soil level, even if their leaves eventually overlap above ground.

This matters most when transplanting from nursery pots. Measure from the soil surface center of one hole to the center of the next, not from pot edge to pot edge.
Spacing by Variety and Mature Width
When a plant tag lists both height and spread, always use the mature spread measurement when determining spacing.
| Rudbeckia Variety | Spacing | Mature Spread |
| Rudbeckia hirta (common) | 18 inches | 12 to 18 inches |
| Rudbeckia fulgida ‘Goldsturm’ | 18 to 24 inches | 18 to 24 inches |
| Rudbeckia fulgida (species) | 18 inches | 14 to 18 inches |
| Rudbeckia subtomentosa | 24 inches | 18 to 24 inches |
| Rudbeckia triloba | 24 inches | 18 to 24 inches |
| Rudbeckia maxima | 30 inches | 24 to 30 inches |
| Dwarf varieties | 12 inches | 10 to 14 inches |
Spacing for Seeds
Sow seeds 2 to 3 inches apart. Once seedlings reach 4 to 6 inches tall, thin to 12 to 18 inches. Direct-seeded plants fill in slowly, so starting with tighter seed spacing helps cover gaps while thinning keeps airflow healthy as plants grow.
Spacing for Seedlings and Transplants
Transplant seedlings at 12 to 18 inches for compact types, or 18 to 24 inches for standard and large varieties. Young plants look sparse at first, but standard varieties fill in well by the second growing season.
Why Your Black-Eyed Susans Look Too Far Apart (Year 1 vs Year 2)
This is one of the most common concerns for first-year gardeners. A freshly planted bed at 18-inch spacing looks underwhelming with wide gaps between plants. That is exactly how it should look.
Here is what to expect at each stage:
| Year | What to Expect | Action Needed |
| Year 1 | Small plants, visible gaps | Water, mulch, resist filling gaps |
| Year 2 | Plants fill most of the bed | Deadhead, monitor spreading |
| Year 3+ | Full coverage, clumps expanding | Divide as needed every 3 to 4 years |
Filling gaps with extra plants in year one is the most common cause of overcrowding by year two. If the empty space bothers you, fill gaps temporarily with annuals that you plan to remove.
Applying a 2- to 3-inch layer of mulch can also help suppress weeds and retain soil moisture while young Black-Eyed Susans fill in the space.
Black-Eyed Susan Spacing and Grid Layouts (Rudbeckia)
How you arrange plants in a bed affects how quickly it fills in, how it looks at maturity, and how air moves through the planting. Two layouts work best for Rudbeckia.
Square Grid Layout
Plants sit in straight rows at equal center-to-center spacing in both directions. Use an 18-inch grid for standard varieties. Mark rows with garden twine before planting to keep distances consistent.
This layout suits formal beds and borders. It leaves visible soil in year one but reaches full coverage by year two to three.
Triangular (Offset) Layout for Denser Coverage
Each row is offset by half the spacing distance so plants stagger between the rows behind them. At 18-inch spacing, offset each alternating row by 9 inches.

A triangular layout fits 15 to 20 percent more plants per square foot than a square grid and closes gaps faster. It also looks more natural in informal or meadow-style plantings.
Border Planting Layout
Single row borders work well at 15 to 18 inches along walkways or fences. Keep plants 12 to 15 inches from the edge. For a fuller border, add a second row behind the first, offset by 9 inches. Place taller Rudbeckia varieties like R. triloba at the back, compact types at the front edge.
Black-Eyed Susan Plant Count Calculator by Bed Size
Use this formula to estimate how many plants you need:
Bed square footage x planting density = approximate number of plants needed.
Not sure how many Black-Eyed Susan plants your garden bed can hold? Use the calculator below to estimate plant spacing and planting density.
✓ Copied!
About This Plant Spacing Calculator
The Plant Spacing Calculator converts between row spacing, in-row spacing, and plant population — helping farmers and gardeners plan bed layouts for vegetables, ornamentals, and field crops. It supports both metric and imperial units and is especially useful when scaling a crop area up or down while maintaining the same population density.
Formula Used
Plant Spacing (cm) = √(10,000 ÷ Target Population per m²) for equidistant spacing. For row-based planting: In-Row Spacing = 10,000 ÷ (Plants per ha × Row Spacing m).
Usage Tip
For square-foot gardening, divide 144 (inches² per sq ft) by the plant’s recommended spacing in inches squared — this gives the number of plants per square foot for intensive raised-bed layouts.
Planting density by spacing: 12-inch spacing = 1 plant per sq ft. 18-inch spacing = 0.44 plants per sq ft. 24-inch spacing = 0.25 plants per sq ft.
| Bed Size | 18-inch spacing | 24-inch spacing |
| 4 x 4 feet (16 sq ft) | 9 plants | 4 plants |
| 4 x 8 feet (32 sq ft) | 14 to 16 plants | 8 plants |
| 5 x 10 feet (50 sq ft) | 22 plants | 12 plants |
| 10 x 10 feet (100 sq ft) | 44 plants | 25 plants |
Spacing Black-Eyed Susans in Raised Beds and Containers
Raised beds allow slightly tighter spacing because the soil is loose, well-drained, and nutrient-rich. Compact varieties can go at 12 inches, standard types at 15 to 18 inches. Avoid going below 12 inches regardless of soil quality.

Raised Bed Intensive Planting
| Method | Spacing | Best For |
| Standard spacing | 18 to 24 inches | Ground beds, borders |
| Intensive (raised bed) | 12 to 15 inches | Compact varieties only |
| Mass planting | 18 inches | Naturalized meadows |
Black-Eyed Susan Spacing in Containers
Containers work well for compact and dwarf Rudbeckia varieties. Use one plant per 10 to 12-inch pot. In a wider planter (18 inches or more), space two compact plants 12 inches apart center to center.
Standard varieties grow too large for most containers and become root-bound quickly. Stick to dwarf types like Rudbeckia hirta ‘Toto’ for pots and container gardens.
Black-Eyed Susan Spacing in Humid vs Dry Climates
Climate directly affects how much spacing your plants actually need. This is one factor most planting guides leave out.
Humid Regions
In humid areas, use the wider end of the spacing range. Tight plant density traps moisture between leaves and stems, which creates the conditions where powdery mildew takes hold fastest.
In the Southeast, Gulf Coast, and Pacific Northwest, space standard varieties at 20 to 24 inches rather than the typical 18. Extra airflow is worth more than a slightly fuller-looking bed in year one.
Hot, Dry Regions
In arid climates like the Southwest or high plains, plants stay slightly smaller due to heat and limited moisture. You can plant at 15 to 18 inches without overcrowding concerns.
In dry conditions, tighter spacing also helps plants shade each other’s root zones, which reduces soil moisture loss. Monitor for stress symptoms and water at the base, not overhead.
What Affects Black-Eyed Susan Plant Spacing?
Variety and Mature Clump Size
The single biggest factor. A dwarf Rudbeckia hirta tops out at 10 to 14 inches wide. Rudbeckia maxima spreads to 24 to 30 inches. Spacing based on seedling size instead of mature clump size is the root cause of most overcrowding problems.
Sunlight and Soil Fertility
Plants in full sun with amended soil reach the upper range of their mature size. In part shade or lean soil, plants stay smaller and can handle spacing at the lower end of the range.
Full sun means 6 to 8 or more hours of direct light daily. Part shade is 3 to 6 hours.
Airflow and Disease Prevention
Powdery mildew spreads fastest between plants with restricted airflow. In humid regions especially, wider spacing is a direct disease prevention strategy, not just an aesthetic preference.
Signs Your Black-Eyed Susans Are Too Crowded
Watch for these symptoms in an established planting:
- Powdery white coating on leaves (powdery mildew)
- Fewer blooms than the previous year
- Stems flopping or leaning outward
- Dead or bare patches in the center of clumps
- Reduced airflow and persistently damp foliage
- Plants visibly competing for light, leaning away from each other

When to Divide Overcrowded Black-Eyed Susans
Divide clumps every 3 to 4 years in early spring or early fall. If the center of the clump becomes bare or flowering declines noticeably, overcrowding is usually the cause. Dig up the clump, discard the woody center, and replant the healthy outer sections at proper spacing.
How Far Apart to Replant Divided Black-Eyed Susans
Replant divisions at the same spacing you would use for new plants: 18 inches for standard varieties, 12 inches for compact types, 24 inches for large varieties. Fresh divisions fill in faster than seedlings, so do not crowd them thinking they need less space.
Avoid planting divisions in the exact holes where the original clumps were growing. Soil in those spots is often depleted. Move divisions a few inches in any direction and amend with compost before replanting.
Adding compost before replanting helps improve soil structure, drainage, and nutrient availability for healthy root growth.
How Fast Do Black-Eyed Susans Spread?
Black-eyed susans spread in two ways: gradual clump expansion from the root crown, and self-seeding when seed heads drop in fall.
Penn State Extension notes that black-eyed susans are long-lived, adaptable perennials that gradually expand and form larger clumps over time.
Clump Expansion
Perennial types like Rudbeckia fulgida ‘Goldsturm’ expand 2 to 4 inches per year from the root base. A single plant grows from 6 inches wide at planting to 18 to 24 inches wide by year three or four. Plan for this in your spacing decisions.
Self-Seeding
Rudbeckia hirta (annual and biennial types) drops seeds at the end of the season. According to the USDA Plant Guide, black-eyed susan readily establishes from seed and can naturalize in suitable growing conditions. Those seeds germinate the following spring and fill bare soil gaps on their own. Leave seed heads on the plant through fall to encourage natural reseeding.
Deadhead spent flowers before seeds drop to keep self-seeding under control in formal beds.
Spacing for Naturalized Plantings
In meadow or naturalized settings, start at 24 to 30 inches and allow self-seeding to fill the space over two to three seasons. The result looks more natural and requires less maintenance than a tightly planted formal bed.
Black-Eyed Susan Spacing for Mass Planting
Mass planting means placing 20, 50, or more plants across a large area, such as a meadow strip, roadside planting, or a wide naturalized bed. The spacing logic shifts when you are covering ground rather than designing an individual bed.
Quick Coverage vs Long-Term Health
At 15 to 18 inches, a mass planting fills in within one to two seasons and creates strong visual impact quickly. The tradeoff is that clumps start competing by year three or four and need earlier division.

At 18 to 24 inches, plants take longer to fill the space but stay healthier and require less maintenance over time. For a planting you want to last five or more years with minimal intervention, 18 to 24 inches is the better choice.
Mass Planting Spacing by Goal
| Goal | Spacing | Fill Time |
| Instant visual impact | 15 inches | 1 season |
| Balanced coverage | 18 inches | 1 to 2 seasons |
| Long-term low maintenance | 24 inches | 2 to 3 seasons |
| Naturalized / meadow | 24 to 30 inches | 3+ seasons (self-seeds) |
For large-scale plantings over 500 square feet, use the triangular offset layout at 18 to 24 inches. It uses fewer plants than a square grid for the same coverage and looks more natural at scale.
Spacing Black-Eyed Susans With Companion Plants
Black-eyed susans work well with coneflowers (Echinacea), salvia, and ornamental grasses. Keep companion plant spacing as consistent as possible with the plants around them.
| Companion Plant | Spacing From Rudbeckia | Notes |
| Coneflower (Echinacea) | 18 to 24 inches | Similar mature width, alternate rows |
| Salvia | 12 to 15 inches | Place at front of border |
| Ornamental grasses | 24 inches | Check mature clump size first |
| Purple prairie clover | 18 inches | Good pollinator pairing |
Map out mature widths on paper before mixing species in one bed. Ornamental grasses in particular can spread aggressively in rich soil and overtake neighboring plants.
Spacing Black-Eyed Susans in Mixed Flower Beds
When adding Rudbeckia to an existing bed, measure spacing based on the mature plant width of both the black-eyed susan and its neighbors, not their current size. A good rule of thumb is to leave at least 6 to 12 inches between the projected mature edges of neighboring plants.
For example, if a black-eyed susan matures to 18 inches wide and the plant next to it matures to 14 inches wide, the two plants together take up 32 inches of mature spread. Plant them 20 to 22 inches apart center to center to keep a small buffer between their mature edges.
Avoid placing Rudbeckia directly beside aggressive spreaders like bee balm, goldenrod, or mint. These plants compete hard for root space and airflow, and they tend to win. Give black-eyed susans a defined zone in mixed beds so they are not gradually pushed out by neighboring plants.
Common Black-Eyed Susan Spacing Mistakes to Avoid
Spacing Based on Seedling Size
A plant that is 6 inches wide in the pot may spread to 20 inches at maturity. Follow the spacing on the plant label. Trust the numbers even when the bed looks wide open in year one.
Using the Same Spacing for All Rudbeckia Varieties
A dwarf Rudbeckia and a Rudbeckia subtomentosa or R. maxima are very different plants in size and plant density needs. Match spacing to the specific variety, not to black-eyed susans as a group.
The gaps you see in year one are normal. Filling them creates overcrowding by year two that is much harder to fix than patience. If gaps are genuinely unattractive, use annual flowers as temporary fillers you plan to remove.
Ignoring Air Circulation in Humid Climates
In high humidity regions, tight planting density leads directly to powdery mildew. Use the wider end of the spacing range and avoid overhead watering. Water at the soil line to keep foliage dry.
Frequently Asked Questions
Can black-eyed susans be planted close together?
Yes, compact varieties can be planted 12 inches apart. But most standard varieties perform best at 18 inches to maintain proper airflow and reduce disease risk. Going below 12 inches is not recommended for any variety, as restricted airflow leads directly to powdery mildew and reduced bloom production.
How far apart should you plant black-eyed susans?
Standard black-eyed susans need 18 inches of center-to-center spacing. Compact and dwarf types can go at 12 inches. Large varieties like Rudbeckia maxima need 24 to 30 inches. Always check the mature spread on the plant tag and use that as your minimum spacing.
How many black-eyed susans fit in a 4×4 bed?
A 4×4 foot raised bed fits 9 plants at 18-inch spacing using a square grid. A triangular offset layout fits 10 to 11 plants. For compact or dwarf varieties at 12-inch spacing, the same bed holds up to 16 plants.
What spacing works best for maximum blooms?
18 inches gives the best balance between bloom production and plant health for most standard varieties. Plants at this distance have enough root space and light access to produce strong flowering without competing with neighbors.
How far apart should Rudbeckia Goldsturm be planted?
Rudbeckia fulgida ‘Goldsturm’ does best at 18 to 24 inches apart. It forms tight clumps that expand slowly outward each year. At 18 inches, the planting fills in naturally by the second or third growing season. At 24 inches, plants stay more defined as individual clumps.
Do black-eyed susans spread on their own?
Yes. Perennial types expand slowly by clumping, adding 2 to 4 inches of width per year. Annual and biennial types self-seed, dropping seeds in fall that germinate the following spring. Both types benefit from division every 3 to 4 years to prevent overcrowding.
Final Thoughts
Black-eyed susan spacing comes down to one thing: the mature size of the variety you are planting. Standard types need 18 inches. Compact types work at 12. Large varieties like Rudbeckia maxima and R. subtomentosa need 24 to 30 inches.
The bed will look sparse in year one. That is fine. Plants filling their full space by year two or three is the goal. Resist overcrowding, divide clumps every few years, and your planting will stay healthy and productive for a long time.
Disclaimer: Gardening information on Garden Truth is for educational purposes only. Results vary by climate, soil, weather, and growing conditions. For region-specific advice, consult your local USDA Cooperative Extension Service before making major gardening or soil changes.


Leave a Comment
Your email address will not be published. Required fields are marked with *